Sunday, July 31, 2016

Lights Camera Action Double Page Layout | Celebr8

#kerriegurney #celebr8

Hi Everyone
Kerrie here with a double layout I created using Celebr8's Snap It Collection
I met Dennis & Erin the owners of Celebr8  while in South Africa when they offered to come and take me out for the day on one of my days off. It is a day I will forever treasure as not only did I get to spend the day with two of the sweetest people, they took me to spend the day at  The Lion & Safari Park . There really are no words to describe how amazing our day was but it is one I will never forget. The generosity of Dennis and Erin didn't stop there they also gave me a box filled with their fabulous collections, so look out for more layouts using their gorgeous Celebr8 collections.


and to keep with the South African theme
I have used Cariena Basson from Scrapbook Studios' July sketch


I haven't used flowers as my photos from the Keith Urban and  Sheppard concert weren't flower type photos


here are some close ups of my chipboard embellishments. I coloured them with my brown dye ink pad and then popped on some texture paste and love how when they dried they have that crackled effect. I coloured my ric rac with some brown mist


I will leave you all with this photo of Dennis, Erin and I  hanging out with our furry friends
can you believe how incredibly adorable these boys are.
I still cannot believe I got to play and walk with these gorgeous boys.
Thank you Dennis & Erin for an amazing day. 

 Happy Creating 
Kerrie


Friday, July 29, 2016

Love Magnolia Layout | Ultimate Crafts Couture Creations

#kerriegurney

Hi Everyone 
Kerrie here with a layout of my baby girl celebrating her Sweet 16th birthday
all papers, dies and embossing folders are from the gorgeous
Ultimate Crafts Magnolia Lane Collection


1.       Die cut  Damask Frame using white cardstock to use as a stencil
2.       Using the damask die cut apply texture paste randomly onto base Ivory Cardstock
3.       Sprinkle Iridescent Glitter onto the texture paste while it is still wet and set aside to dry or dry off using heat tool
4.       Cut 1 x 21cm x 11cm mat from Rosehip Memories (B side) patterned paper
5.       Cut 1 x 2505cm x 9cm  strip from Floral Fancy pattern paper
6.       Cut 1 x 6cm x 25cm strip from Sweet Music (B Side) pattern paper
7.       Cut 1 x 15cm x 14cm piece from Butterflies and Lace pattern paper
8.       Cut Butterfly label from Poetical Labels pattern paper
9.       Emboss Sweet Music strip using Petite & Tied Together Embossing Folder
10.   Distress the edges of all pieces including ivory cardstock base and lace border from ephemera pack
11.   Diecut Magnolia Corners from Rosehip memories paper B side
12.   Layer all pattern paper pieces onto base card (for more dimension use some foam mounting tape on some of the layers)
13.   Add photo (or photo can be added later)
14.   Embellish using diecuts, ephemera pieces and ribbon

15.   Finish off with a sprinkling of Pearls and a little Glitzin’ Glamour Crystalina Glitter Glue 


Products Used

Photo Size; 4x6 Portrait 


Thanks for stopping by
Don't forget to follow the Artdeco Creations Blog and also follow Couture Creations|Ultimate Crafts on
FacebookPinterestInstagram and Twitter


 Happy Creating 


Saturday, July 23, 2016

Shabby Chic Magnolia Lane Cards | Ultimate Crafts Couture Creations

#kerriegurney #ultimatecrafts #couturecreationsaus

Hi Everyone Kerrie here back on the Artdeco Creations Blog with two shabby chic cards created using Ultimate Crafts Magnolia Lane papers, dies, embossing folders, stamps and embellishments

I created these cards as part of my card class at SENZ


Both cards are 15cm x 15cm Square Cards, which means both cardstock card bases are cut to 15cm x 30cm and folded in half.


Just Because Card
                   Cut 1 x 14.5cm x 14.5cm piece from pink paper

      1 x 6.5cm x 8cm piece from blue diamond paper
      Cut 1 x 6.5cm x 13cm piece from blue diamond paper and create pennant
      Cut 1 x 6cm x 12.5cm piece from Magnolia Borders paper and create pennant
       Diecut Square Magnolia Frame from Timeless Garden paper
      Cut Birdcage from Poetical Labels paper
       Distress and Ink the edges of all pieces
     Stamp Just Because from Magnolia Lace Stamp Set and create pennant
      Layer all pieces onto card base using foam tape to raise up pennant, birdcage and sentiment
   Create a next using cotton thread
   Adhere Paper Magnolia on top of cotton thread using Turbo Glue Pen
  Create a bow with Seam Binding Ribbon and adhere under flower
 Finish off with a sprinkling of Pearls and Crystalina Glitter Glue


Embossed Magnolia Card
  Cut piece of Damask Curtains paper down to 10cm x 15cm
       Emboss the B side using Magnolia Lace embossing Folder
      Fussy cut both the borders from Magnolia & Lace pattern paper
      Die Cut from Rosehip Memories B side 1 x Magnolia Doily
      Die cut from ivory cardstock the leaves only from Rose Cutting Die set
      Distress and Ink the edges of all pieces
       Layer all pieces onto card base using Turbo Glue Pen or Double Sided Tape, use foam mounting tape to adhere the doily center
      Run a strip of 6mm double sided tape along the edge of embossed piece.
      Remove backing paper from tape and cover with Iridescent Super Fine Glitter
  Create a nest using cotton thread
   Adhere Magnolia paper Flower using Turbo Glue Pen

  Finish off with a sprinkling of Pearls and some Crystalina Glitter Glue

TIP; use Quick Release Die Cutting Paper when diecutting as this helps to release all papers and cardstock from the dies

Products Used


Thanks for stopping by
Don't forget to follow the Artdeco Creations Blog and also follow Couture Creations|Ultimate Crafts on
FacebookPinterestInstagram and Twitter

 Happy Creating 


Thursday, July 21, 2016

SENZ Recap

#kerriegurney #SENZ #warehousestationery #ulitmatecrafts #couturecreations

Hi Everyone

sorry to be so slack with my blog posts and my recap after attending SENZ 
 I was so excited to head to Auckland to teach classes, and demonstrate for Warehouse Stationery showcasing Couture Creations & Ultimate Crafts products

I had a fabulous time and the Warehouse Stationery team we amazing and so much fun
SENZ was a very busy show and so I only took a couple of photos, very slack I know but hey when I'm busy teaching and demonstrating I don't even think about taking photos.


here is just some of the awesome Warehouse Stationery team


all set up ready for day 1


Luckily I was very spoilt and had class assistants in my classroom each day and so when they weren't busy they took some photos, still not many as we were enjoying spending time with the lovely ladies in all my classes.


doing my thing in the Demo Theatre


the lovely Lois and I after my last class


Trina and I before my last class 


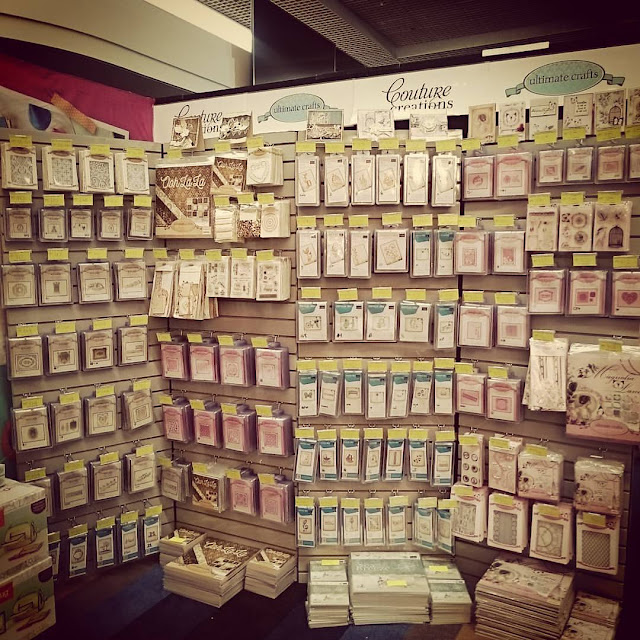
the Ultimate Crafts and Couture Creations wall of goodness which Warehouse Stationery had the exclusive launch of the Ultimate Crafts Ooh La La collection


a look inside two of my class kits, ( not sure why but I didn't take a photo of my card class kit)  the double page layout class kits was filled with Ultimate Crafts Ooh La La which was exclusive to Warehouse Stationery at SENZ and was a world launch at the show


a little late night creating in my hotel room with Ultimate Crafts Ooh La La and Background Gallery 2 collections


did I mention it was cold in Auckland ..look at the frost on the racetrack


When I arrived in Auckland it was foggy and pouring rain so much so that it took ages to unload the baggage and when it was it was soaked

but on Monday it was a glorious day


 looking over at Auckland from the lookout


time to head home, I arrived in the Emirates A380 and went home in the baby Qantas plane beside it


lastly my gorgeous flowers that arrived the day after I arrived home from Ange and the Warehouse Stationery team

I would like to give a huge Thank you to Ange and the Warehouse Stationery team for having me and I look forward to next year :)
a huge Thank you also to Tony, Chris and the Sanzi team for looking after me too

I will share my classes soon

 Happy Creating 
Kerrie


Wednesday, July 13, 2016

Lifou Island | Couture Creations

#kerriegurney #couturecreationsaus


Hi Everyone Kerrie here with another project created for Artdeco Creations Blog

I have used the gorgeous  Couture Creations Sea Breeze Collection designed by Denise Boddey for this Double Page Layout
(this is to show my South African friends I can do double pages :) )


This is a super quick layout to re create
I have  cut strips of Sea Breeze patterned paper  and then using a 6x6 piece along with the matching 12x12 piece of Weatherboard pattern paper create bigger mats


I then cut out the ships wheel and shell along with the three shells from Secrets of the Ocean 6x6 pattern paper
I also cut A Day at the Shore label from Caught in the Wind pattern paper.

I then distress and inked all the edges of all pieces of pattern paper, shells and some pennant piece from the ephemera pack
I then layered all the pieces on and then added some splatter to the background before adding my photos


here is a closer look at the pages


To create my cluster on the second page I used the Turbo Glue Pen to adhere everything on placing some White Netting down first. I pulled apart a Paper Magnolia Flower and added some broken shells to the centre of the flowers.


I diecut a label and cut it in half to add a piece to each page of my layout


Thanks for stopping by
Don't forget to follow the Artdeco Creations Blog and also follow Couture Creations|Ultimate Crafts on
FacebookPinterestInstagram and Twitter


Couture Creations Products Used
CO724660 Sea Breeze 12x12 Pattern Paper, Sea Shells on a Sea Shore
CO724666 Sea Breeze 12x12 Pattern Paper, Deep Seas & Whirling Winds
CO724667 Sea Breeze 12x12 Pattern Paper, Weatherboard
CO724658 Sea Breeze 12x12 Pattern Paper, Silver Sands
CO724668 Sea Breeze 12x12 Pattern Paper, Caught in the Wind
CO724651 Sea Breeze Paper Pad, 6x6
CO724681 Sea Breeze Die Cut Ephemera Pakc
CO724678 Sea Breeze Trinkets
CO724732 Sea Breeze Charms
Co724733 Sea Breeze Netting
ULT157508 Magnolia Lane, Paper Magnolias


 Happy Creating