Thursday, February 27, 2014

Photo Continental Silly Sunday Sale


Tracey and I will be at Photo Continental this Sunday doing 
FREE MAKE AND TAKES
come along and say HI 
I like a flat white no sugar and Tracey likes a latte :)


and

 
Kerrie Gurney

will be at Photo Continental for their Silly Sunday Sale

this Sunday


http://www.photocontinental.com.au/


Come along and join us for
FREE MAKE & TAKES 
using our new
 and


Happy Creating Kerrie

Saturday, February 22, 2014

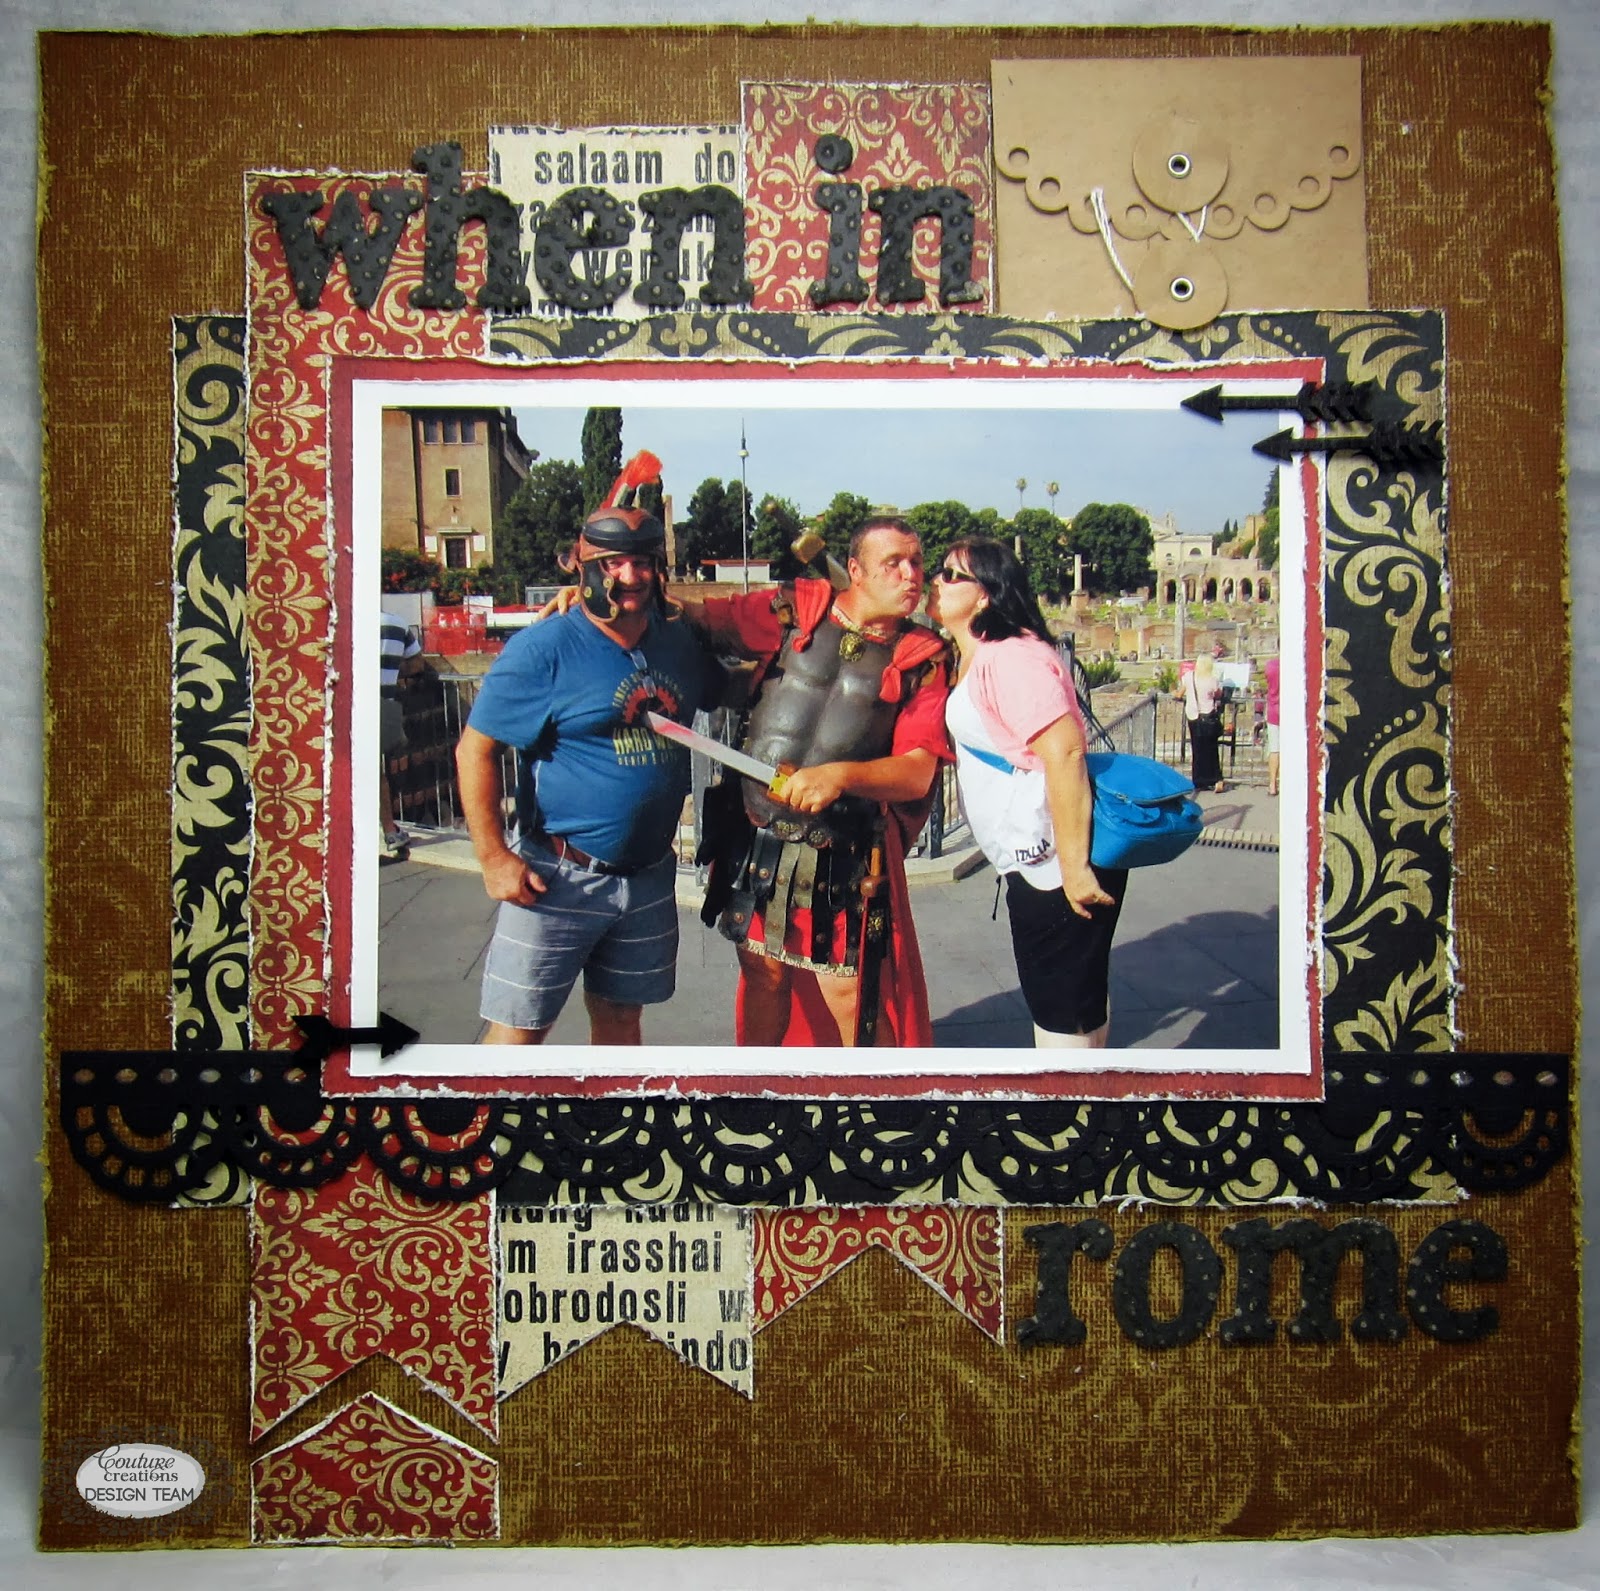
When in Rome

Hi all,

It's Kerrie again and it is my turn on the Couture Creations Blog and for my post today I have created a layout with my of my favourite photos from Rome. Wayne told me not to get my photo taken with any of the guys dressed as gladiators as they would ask for money ...but how could I resist, even Wayne joined in the fun but he was correct as they hit me up for 20 Euro for a few photos but to me it was money well spent as we got some fun photos with this guy in front of the Roman Forum.


Onto creating my layout


Firstly start off creating a shabby textured background by using Extra Confetti Embossing Folder under a piece of Core'dinations cardstock and sand to allow the pattern of the embossing folder show through. 
Do this over the complete piece of Core'dinations cardstock.


Cut pieces of patterned paper for layering as per photo creating pennants with each of the strips. With the largest strip keep the cut off piece to add to layout. Distress all the edges of cardstock, patterned paper and photo using the edge of scissors.


Using black core'dinations cardstock die cut one of the 12" border dies from the Momento Chandeliers set.
Use Quick Release Die Paper so that your die cut pops straight out of die
Place the quick release die paper onto the die blades side up and then your cardstock and run through machine. 


When you use the Quick Release Die Paper you only need to flick your die cut piece and all the bits will fall out, no painful poking :)


next colour chipboard alpha using a spray mist, paint or black ink pad.


 Once dry use Fine Dots Embossing Folder to emboss


Sand alpha letters with sanding block to let chipboard chow through and give a shabby aged look to alphas for title.

Layer all onto your base I have also added a pocket envelope to place my journalling into, you can either make one or use a bought one. Adhere in place using Couture Creations double sided tape.


Couture Creations Products Used
CO723282 Elegance Embossing Folder, Extra Confetti
CO723641 The Harmony Embossing Folder, Fine Dots
CO723247 Momento Ornamental Lace Die, Chandeliers Set
CO723060 Sanding Block
CO721955 Pointed Non Stick Scissors
CO723818 Quick Release Die Paper
CO721957 15x15 Self Healing Mat
CO721985 6mm Double Sided Tape


Other Products Used
Core'dinations, Tim Holtz Cardstock
Teresa Collins, World Traveller Patterned Paper
Maya Road,  Pocket Envelope
Maya Road, Charcoal Mist
Freckled Fawn, Wooden Arrows

Don't forget to LIKE Couture Creations on Facebook

Happy Creating


Friday, February 14, 2014

Happy Valentines Day

wishing everyone a day filled with love and happiness


Happy Creating Kerrie

Tuesday, February 11, 2014

Nested Heart Banner and Card

Hi Kerrie here wishing you all a Happy Valentine's Day for this Friday.

While we don't really celebrate Valentine's Day in our house, we do celebrate my love of decorating and who can resist creating soft pretty pink things especially banners as I do love a banner and I bought these gorgeous silver glittery stag heads in the after Christmas markdowns and wanted to incorporate them in my Valentine decorating.

and so I present to you

this very quick and easy NO SEW Heart Banner, that anyone can create and you can create for any occasion.


I created this banner using the largest of the new Craft Concepts Buntings Nesting Dies.
I die cut 15 buntings using an old dictionary, the beauty of using old book paper is that you can cut several sheets at one.


 I die cut 5 sheets at a time and used the Metal Adapter Plate to help with cutting with only 
one pass through my machine


Next using  the 3 smaller sizes of Couture Creations Heart Nesting Dies I die cut 15 of each heart in three different patterned papers.


I then laid them all out working out the pattern


I then applied 6mm double sided tape to only the middle of each heart layered them together and adhered them to the banner. 


here is a closer look


apply double sided tape to the back top of each banner


adhere to ribbon and pinch each layer so the hearts aren't laying flat


I also created a special card creating another one of the banners and adding an ornamental lace die


Firstly I cut a piece of Core'dinations cardstock to 4.5" x 12" and folded it in half, i then embossed the one half using the Celebrate Embossing folder 


I then sanded it back to reveal the core colour


I die cut a Cappuccino Ornamental Lace Die from white Core'dinations cardstock


die cut one each of the heart dies and one of the bunnting dies, layer together


layer everything onto base card and finish off with a double bow and some trinket pins


lastly I added a lace border using one of the Momento Chandelier Ornamental Lace Border Dies and a ribbon bow to this cute little paint tins I filled with Valentine M&M's


 to adhere this border to the paint tin I used Couture Creations 3mm Double Sided Tape as it fits perfectly along the edge

I finished off the border with some Pink Blush Pearls 


I hope you have enjoyed my little projects 
Happy Valentines Day to you all

♥♥♥

Here is a look at all the dies I have used


Couture Creations Products Used

Other products
Seam Binding Ribbon
Maya Road Trinket Pins
Patterned Paper

Don't forget to LIKE Couture Creations on Facebook


Take care and happy creating


Saturday, February 8, 2014

Couture Creations Creative Inspiration Magazine

Did you know Couture Creations now publishes a FREE bi monthly magazine filled with inspiring projects created using their newest releases

You can pick up a copy from your local papercrafting store or you can view it online

HERE


I have one project in it of Miss T when she got her new glasses. 


Back in my day you would rather chop your head off than get glasses but that doesn't seem to be the case now.After picking up her new glasses I went to check something on my phone and came across about 50 selfies of Miss T and her new glasses so of course I had to do a layout :)

All the step by steps are in the magazine so you can recreate this layout. 

I printed the photos using my Polaroid GL10 Printer which I just love.
Couture Creations Products Used


Other Products Used
Teresa Collins, Family Stories Collection 
Becky Higgins Project Life Cards, Dear Lizzy


Happy Creating Kerrie